It would be more work than it is worth to get a picture to upload for this. I am running on 3 hours of sleep, gave a presentation, had class until 9PM, and am completely and utterly exhausted. I was also starting when I got home. I needed something quick, and grilled cheese is my comfort food.
I used wheat bread and put a slice of mozzarella (yes slice, not shredded) on one side and a smear of pesto on the other. You know what it needed? BACON. Please, please make this and put bacon on it. That would be so delicious. But I was way too hungry to wait for bacon.
I smeared some butter on one side of the outside of the samich, put a pat of butter in a skillet and plopped the samich in non-buttered side down. Cooked it until toasty, ate, and enjoyed.
And then I ate some more homemade graham crackers that I made yesterday. Holy cow they are YUMMY! They really do taste like graham crackers. I know that may sound crazy to say, but who knew it was that easy to make them? Homemade cheesecake crust is on the horizon.
I really wanted nutella ice cream to go with my grahams. Someday I will have NI and HGC's together at last.
I am rambling because I am exhausted. I can feel my eyes sinking back into my skull haha.
Happy crafting!
Pin It Now!
Thursday, January 31, 2013
Wednesday, January 30, 2013
Homemade Graham Crackers

Ingredients:
-1/2 C Milk (I used half milk, half almond milk...because I had it)
-1/4 C honey
-2 Tsp Vanilla** (original recipe I was basing mine off of called for 1 TB...but I was a little gun shy on putting that much in. You do what you feel like).
-2 Cups AP Flour
-1/2 C Wheat Flour
-1 C brown sugar packed
-1 tsp baking soda
-1/2 C salted butter
You have two choices. You can mix the wet ingredients first and then mix all the rest in like I did in the same bowl. Or you can dirty up two bowls, do the milk honey vanilla in one and the dry + butter in the second one, and then combine. Clearly mixing them all in at the same time worked out ok for me.
You have a second round of choices. You can deal with the dough straight from the mixing bowl like I did, acknowledging that it is going to be super sticky and kind of frustrating. Or you can chill it for an hour. Either way you have to turn your dough out onto a floured surface. Either way you want to work with about 1/3 of the dough at a time. My way just involved it being slightly irksome and slurping up flour left and right and nearly sticking to my kitchen island. BUT it did save me a whole hour.
Preheat your oven to 350, place the grahams on baking sheets (I put mine on parchment paper) and poke some holes in them with a fork. For the record, I completely cannot stand Reynolds Wrap's weird parchment paper with the foil backing on it, but it happens to be the only thing I have on hand. And when it comes to one less thing to wash at 1 AM in the morning when I am playing catch up...that will be a godsend.
Since some of mine were pretty thick and I made mine rather large, I baked mine for about 9 minutes, maybe 10. If yours are more thin and regular, you will be looking at a time of 6-8 minutes. The original recipe definitely rolled theirs more thin than mine, as they got 64 out of it and I got 28. But I like the softer, almost shortbread texture. So I really don't mind a bit. When mine came out of the over I sprinkled them immediately with a cinnamon sugar mix.
What I do mind, however, is that I have no ICE CREAM to go with these. What a buzzkill.
Interesting things of note: you could not cut these, and press them into a pan and make a giant pseudo cookie cake out of them. That could be fun. Perhaps a base to a dessert pizza. Who knows.
I personally like the flavor of these, even though my vanilla was substantially less than that of the original recipe. These are not overly sweet or potent, which sits well with me. They are dessert without being dessert. And they would taste great with nutella.
I am sure this will be a future experiment of mine of completely changing the flavor and profile of these into all sorts of crazy shenanigans.
Happy crafting! Pin It Now!
Tuesday, January 29, 2013
Drawing Journal

 Anyway, I believe I am going to start each page out with a line pattern like this where I will write whatever I am thinking about at that moment. I have yet to decide if I am going to do pages or spreads, but I am thinking about just pages. That way, whatever I need to get off my chest has only one small sketchbook page to happen. No room for fluff!
I also decided that I want to take the main point of the message and convert it into the artwork. For my first little entry I was thinking about what it means to be me. The overall concept that I used to the artwork soon became "Strong Bird by definition, Green Zebra by choice."
This fit my color scheme well and comes from when I used to look through those baby name books to see what mine and others names meant. Between my first and middle name I get strong bird. Maybe that's accurate, maybe it isn't, all I know is that I really do think peacocks are gorgeous and penguins are hilarious and ostriches are just awkward looking in the best way possible. So maybe I am cool with the bird idea.
But since I am not the typical young adult and am very much not always the typical female, I identify more with my concept of being a greenzebra in a sea of black and white (in case anyone was ever wondering where the greenzebra stuff came from, that is part of it).
I really think this could be a fun idea and a good use of a sketchbook. This is going to be for all of my things that I may not want to specifically put on my blog, but may eventually want to show someone.
Should be fun!
Happy crafting.
Pin It Now!
Monday, January 28, 2013
Pumpkin Cheesecake Wontons

I also love using things I already have. How convenient. I happened to have some leftover maple cream cheese icing...mwahahaha. Here we go!
-1/4 pack of reduced fat cream cheese
-1 TB maple syrup
-1/4 tsp vanilla
-1/4 C pumpkin
-1/4 tsp or LESS of cinnamon
-4 shakes of ginger
-1 shake of nutmeg
-1/4 c powdered sugar
 OR, just your leftover icing from those yummy cinnamon rolls with pumpkin and spices added in. Anyway mix all those together and fill wontons with the mix. I rubbed a little oil over the top of mine, it really wasn't necessary I just wanted to see if they would get crispier. If you have cloves, you could do less cinnamon and a tiny hint of cloves. I have none. So I had no choice. I in no way shape or form would do any more cinnamon.
 Bake at 350 for about 14 minutes until golden brown and sprinkle with powdered sugar when they come out.
These were pretty darn good, but I think they will be better when they get cold. Caramel drizzled over them when they were hot, or maple syrup, could potentially be awesome as well.
I baked mine on parchment paper so I wouldn't have to wash my sheet. Then I spilled powdered sugar on it. There really is no winning. But these were delicious, so I will count that as a win. I love pumpkin flavored things, I know it really is more of a fall type flavor but I don't care. What the heck does winter have anyway?
Soup?
Peppermint?
Peppermint soup wontons? I think not. So, pumpkin it was haha. Plus I have been pining to make a cheesecake lately and so these at least are a nod to that.
Wontons make everything more fun. I don't know how they do it, but even broccoli would be better in a wonton. No really, a broccoli cheese wonton would be legit.
If you are sitting there thinking how you really don't like pumpkin, shame on you. However, you could use just about any pie filling mixed with cream cheese or fruit mixed with cream cheese and have an excellent cheesecake-esque filling, just replace the maple with honey if you need to. Or do apple pie filling, caramel, and cream cheese. Ignore spices if you are using preflavored things like that. I would consider a hint of ginger with nearly all fresh fruit if it were me. Not banana. Definitely not banana.
Happy crafting!
Pin It Now!
Sunday, January 27, 2013
Chipotl-Egg Bacon Cheeseburger

I made this a few nights ago and wasn't really sure if it was craft of the day worthy, but I have definitely decided it is. Look at the picture, it just says post me. All those layers? Who can argue.
ANYWAY, you need:
-1/4 pound of 90/10 ground sirloin, formed into a burger. I like mine thin and sometimes I do 1/5 pound but you get the drift, a sirloin burger.
-2 strips of bacon, cut in half for easy use on the burger
-1 egg
-Colby Jack Cheese
-Chipotle mayo
I used my largest Rachel Ray green skillet that way I could end up eventually with everything in the same place and not have to wash a million dishes. I dropped the bacon and burger at the same time, as I like my burger well done and my bacon just shy of completely crispy.
Burgers are one of the foods that will actually tell you when it is ready to flip and for that I love it right as much as I love pancakes. It is essentially foolproof if you are of the variety that likes yours a little more on the done side. If you like yours with a strip of pink down the center...I don't want to know so don't tell me.
HA!
Anyway I like to flip my burgers once and once only. So when the burger juices all start coming to the top and the edges start to pull up from my skillet, it gets a good flip. Bacon I sometimes flip multiple times, or I flip it once because I forget I was cooking it.
So once the burger was flipped I let it cook a few minutes on the new side, took care of the bacon, and scooted it all to the other side of my skillet when it was a few minutes away from done. I cracked an egg close to the other side, the burger and bacon made me not have to grease the skillet which is efficient if you ask me. I let it cook for just about a minute as I threw the eggshell in the trash and wiped off my hands. Then, I put a big lid over the whole skillet and let it all cook until the egg whites were completely white and not mushy when I poked at it with my spatula.
There is something else I hate, mushy egg whites. The yolk was still runny in this egg, as it should be.
Then it was just a matter of assembling it all on toast, which you could skillet toast if you are just throwing all caution to the wind at this point. I suggest a sourdough or texas toast with a little butter on it cooked in the skillet for a few minutes until golden. Then I put the cheese and mayo on and assembled the buger.
It was hot.
It was juicy.
It was spicy.
It was super savory.
It was GLORIOUS.
I would consider avocado and a huge slice of tomato on it next time, but I had neither of these in my fridge. I really need to buy some avocado, now that we have had this talk...
Anyway, the goal in life should be to not just make food, but make DELICIOUS food.
Happy crafting! Pin It Now!
Saturday, January 26, 2013
Extra Dough: Cinnamon Rolls

Sidenote. You really should check out my savory rolls that I made last week. They were delicious, they taste rich and filling like they have meat in them without having meat in them. Crazy, but true.
Anyway I won't burden you with the dough recipe for the umpteenth time, but for reference it is the remaining half of the white/wheat dough that I made the bacon pineapple pizza with. That, btw, was one of the most delicious pizzas I have had in a while, if I do say so myself.
 So I turned the rest of the dough out onto my floured kitchen island that has taken a beating every day since I bought it. Best. Purchase. Ever. If it was on casters it would also make a great serving cart/food cart thing for parties, but let's face it this apartment is too small for large parties and too small to need things on wheels haha.
ANYWAY, back to the cinnamon rolls. I stretched and mashed the dough out thin and then put a heavy coat of cinnamon on it. Next I went with a lighter coat of cinnamon sugar mixed (think 2/3 the amount of the regular cinnamon), followed it with ginger (think about 1/5th of the amount of regular cinnamon), some brown sugar (about 1/3 the amount of the first round of cinnamon), and finished it with a very light sprinkle of nutmeg.
The next thing I did you will skip. I put maple syrup over that, as you can see in the picture. Now, flavor wise, this is great. Messing up the pan and making the bottoms of the cinnamon rolls get really cripsy...it was annoying. I also put maple in the cream cheese icing, which was super yummy.
I rolled mine in from the long way over, to make small two-three bite cinnamon rolls. Big ones would have been super fun too. I greased the bottom of my dark nonstick with butter and cut 1 inch sections off of the roll. I baked them at 375 for 22 minutes.
The maple cream cheese consisted of 1/2 pack of reduced fat cream cheese, 3 TB warmed up maple syrup, about 1/2 C of powdered sugar, and 1/2 tsp of vanilla. You could add more or less of any of these ingredients to get the flavor and consistency you want, they are not set in stone.
All in all, a viable first run at cinnamon rolls with room for improvement. Things I will consider for next time is knocking the temp back to 350 and baking longer, which is where I prefer to bake. I did 375 on these because of the fact that I was making sausage balls with them as well. I will for sure leave out the maple on the inside and just include it in the icing.
Happy crafting!
Pin It Now!
Friday, January 25, 2013
Bacon Pineapple Stuffed Crust Pizza

-2 Cups All Purpose Flour
-1 Cups Whole Wheat Flour
-1.5 tsp salt
-1.5 Cups lukewarn water
-3 Second Squirt of honey
-1/4 tsp yeast
Toppings:
-String Cheese for the Stuffed Crust
-Sauce (duh)
-Mozzarella AND Colby Jack
-About 3-5 strips of bacon, cooked to where it's just crispy
-Pineapple chunks
-garlic
-butter
-garlic cheese topper (yes both)
-Cornmeal
OK. So maybe you know the drill by now on my dough maybe you don't. But this is going to make enough to make two pizzas or pizza and cinnamon rolls, as is what I always seem to do. So mix all the pizza dough ingredients together and let it sit covered overnight to raise. Pop in the fridge the next morning and let it sit there at least a day or so. It develops pretty excellent flavor. I made mine Wednesday morning, it raised while I did homework (yuck), and it was refrigerated from Wednesday night to tonight at 11PM when I got back from a concert and was ready to cook it up.
Drop the bacon into a skillet and get it cooking. Turn half or a little over half of the dough out onto a floured surface. Flour the top and knead and stretch the dough until you get the size you want and the thinness you want. I prefer thin crust. So all the baking times will be for that.
Plop the bacon on a paper towel to get off some of the grease. Sprinkle cornmeal onto the pizza pan (I prefer the ones with holes) and transfer the dough over. Put the string cheese around the edges and roll the dough over it. Layer on your toppings in sauce, half the bacon and pineapple you want to use, mozz cheese to cover the entire top, a light sprinkling of colby jack, and more bacon and pineapple. I tore my pineapple chunks up to make smaller pieces, you could start with crushed and save yourself this effort.
And for my secret why this is awesome trick, sprinkle a hint of regular garlic over the toppings. I am talking like you are lightly salting something.
Put some butter and garlic cheese topper around the edges of the pizza.
Bake at 400 degrees for about 18-20 minutes until it is the doneness that you are gunning for.
This pizza is pretty fantastic, if I do say myself. I used probably half a small can of pineapple when I did it. I actually use spaghetti sauce and I lightly sauce mine because I think sauce is one of the single most overused ingredients in pizza. I prefer people to be able to taste my toppings. Mozzarella is never going to overpower something, hence the only light sprinkle of colby to add another level of flavor onto it. Sauce with all of it's heavy spices CAN easily overpower something, so I go easy on it.
Anyway, it has the boyfriend's seal of approval. So I suggest you give it a whirl.
And all my future dough will be a mix of white and wheat. We are really onto something this time. Pin It Now!
Thursday, January 24, 2013
Chipotle Chicken Salad Version 2.0

-2 chicken tenderloins or 1 chicken breast (whatever is handy)
-1 hardboiled egg
-1/4 c mix of rough chopped pepper pieces with a small ring of onion chopped and mixed in as well
-1/4 c corn
-1 small tomato (think roma or so) chopped
-1 TB chipotle mayo (more as desired)
-1/4 c sour cream
-Salt, pepper, butter, taco seasoning
 Don't get too hung up on the exact measures of the chipotle and sour cream mix. You may want more of it, less of it, stronger chipotle, you really are going to want to make it suit your tastebuds.
Hardboil and peel the egg, and boil the chicken for about 30-40 minutes or until you can shred it with a fork.
In a skillet, sautee corn, peppers, and onions in butter with salt and pepper until the peppers are soft. You may want to put a lid on it and steam it some. Take your shredded chicken and pop it in the skillet with the veggies. Add a sprinkling of taco seasoning, and another pat of butter if needed. Add about 1/4 c water or less to the skillet.
Let that all cook together for five minutes or so, stirring occasionally. Really my goal here was to just get a little flavor on the chicken before mixing it in. Drain the contents of the skillet if necessary and put into a bowl. Mix with chipotle may and sour cream, adjusting one or the other to correct the heat to your taste. I added a little sprinkle of salt and pepper into mine as well.
It is really good on blue corn tortilla chips, but I must say I actually like it better on saltine crackers. You could use plain greek yogurt in place of the sour cream to cut down on some fat and add in some extra protein. This would also be good on sandwiches and in wraps.
Pin It Now!
Wednesday, January 23, 2013
Quick and Easy Stuffed French Toast

-2 pieces of bread
-Cream cheese
-Jelly
-1 Egg
-1/4 C Milk (or part milk, part almond milk)
-1 tsp cinnamon
-1/2 tsp ginger
-Optional hint of nutmeg (I couldn't find my jar, so mine does not have it in there)
 I have made actual stuffed french toast before, where you cut a slit in the side of a slice of some delicious thick artisan bread (like Vienna bread as it tend to have fewer air pockets) and fill it with all kinds of yummy stuffings (I used a cream cheese and key lime yogurt mix with grahams in it), and then batter it and fry it up and you get this huge delicious breakfast dessert that expands for hours after you eat it.
 Yea well, I am in grad school and I have become quite partial to using things I already have on hand. I am not going to buy extra fancy loaves of bread if I already have a loaf of regular bread here.
And yes, I could make my own. But I usually only make dough once a week or once every few weeks for pizza and some small other bread.
So anyway, I was thinking about grilled cheese. I love grilled cheese. And it occurred to me that many people's version of stuffed french toast is a battered grilled cheese equivalent. A delicious breakfast using things I already have? PERFECT.
 So I spread some cream cheese and some homemade strawberry jelly that my mom and sister whipped up. I beat the egg, milk, and spices together in a larger plastic container.
I smooshed (technical term) the sandwhich down to keep it together during battering and flipping.
There is also a good chance I smooshed it down because that is what I do with my bologna samiches...Yea that's right, I like bologna. And HOT DOGS. Don't hate.
Anyways, smooshed samich, dip it in the batter on both sides and butter a skillet on medium or slightly lower heat. Think, typical toast setting. Plop in your stuffed french toast and cook about 2-3 minutes on each side or until it is starting to brown. What you see in the skillet is a little thing I like to call french toasting perfection. That amount of brown is right on track for me.
 Top it off with some REAL maple syrup because I am just as picky about syrup quality as I am on cheese, or use honey. Believe it or not I will buy the Wal-Mart brand of honey. Most likely though, if I tried some organic version from Whole Foods or similar, I would retract that statement. Hence why I will not buy honey from an organic healthy high quality place.
 You could easily get two sandwiches out of this batter amount, and possibly a third. So do not think that you have to up the batter every time you up the sandwich amount. I had to pour some out, but unless you use egg beaters it is really difficult to measure out a part of an egg.
Other flavors that I would suggest:
-Peanut butter and banana on wheat. Why have I stopped buying wheat bread? How did this happen? I may go back to wheat bread sometime. I really used to enjoy it. I would top this particular flavor of stuffed french toast with honey.
-Nutella and mashed raspberries or raspberry jam. Again, I am thinking on a wheat. This would be fantastic. I am getting hungry again just thinking about all this.
-Cream cheese and apple pie filling. You may want to mash up the apples a little in order to make it more manageable.
-Cream cheese and lemon curd for a lemon cream pie feel. Maybe even some grahams crushed up. Yummy.
-Nutella and Marshmellow fluff. Also with grahams, could taste like smores! Hey, maybe dip the battered samich in the grahams and THEN cook. That could be fun.
-Cream cheese and cinnamon, brown sugar mix. Like a cinnamon roll, inside french toast. Tasty.
Alright, now that I am hungry yet again, go make you some french toast samiches and if you try any of those other flavors let me know how they turn out. The possibilities are ENDLESS. This cream cheese and strawberry mix is a definite winner.
Happy crafting!
PS. Eventually I am going to try to get to crafts again, other than just recipes. My grad school work is keeping me much more on my toes this semester, but I have to cook and eat regardless. In case you were wondering why the blog has turned into a temporary, mini food network. Enjoy!
Pin It Now!
Tuesday, January 22, 2013
Special Spuds: Twice Baked Potatoes

Hashbrown something or other, in a muffin pan? Mini tater tot casserole in a muffin pan? Some sort of potatoes in a muffin pan??? PLEASE.
This post has nothing to do with any of that. I just happen to have a thing for plays on words and similar. And muffins. I really do love muffins.
REGARDLESS. I made potatoes that had great intentions behind them but the execution was somewhat flawed. Luckily, when you fail on the most basic principles you can tell others how to correct it and go about your merry way. We learn from mistakes.
Sometimes I swear I just find the bag of potatoes that will never get fully cooked correctly. My microwave consistently burns potatoes while the insides are still raw, and it is a never ending parade of frustration whenever I want a delicious baked potato.
I baked 3 gold flesh potatoes at 425 for right under 50 minutes on a foil lined baking sheet. I would like to go ahead and suggest that you lower the temperature and vastly extend the baking time. I rubbed mine with olive oil and sprinkled with seasoned salt and pepper. I would go 400 degrees for probably an hour and fifteen, flipping every 20 minutes or so and checking them, after trying them like I did. Pull them out when they finally get squishy. And make sure they are either A) nearly exactly the same size or B) you check each individual one and pull them out as needed. I think I checked my smaller one, which skewed my perception of them being done. And why I used 3 potatoes when I am but one person I am not sure.
The important part of this matter, however is the filling. For 3 potatoes, I used 1/2 pack of imitation crab, 4 TB sour cream, 2 tsp of dill, salt and pepper, and colby jack cheese (both on and in the mix). I also sprinkled the tops with bacon bits. It would have been delicious, if my stupid potatoes had been fully done in the first place. How annoying.
I mixed all the filling stuff together after sauteeing the crab with a tiny bit of onion, all in butter of course. I filled the potatoes, topped them with cheese and bacon, and plopped them back in a 350 degree oven for 20 more minutes.
Here are some other filling ideas that I really think you should consider:
-Steamed broccoli, cream cheese or sour cream (or greek yogurt), and colby jack or sharp cheddar cheese. I think it would be EXTRA DELICIOUS if you crushed up ritz crackers to put on top of the potato and drizzled a little butter over it, essentially making broccoli cheese casserole in a potato.
-Pesto (about 1 tsp per potato used, at least to start) and roasted tomatoes, again with greek yogurt or sour cream added in for creaminess. I would really like mushrooms in this scenario as well. Also adding in shredded up spinach leaves would be delicious.
-Shredded chicken, chopped asparagus, and mozzarella. I am not 100% sure where this idea has come from, but the more I think about it the more I like it.
-Chopped up steak (hello leftover utilization!), sauteed green peppers and onions chopped, and mozzarella. Can you say, philly cheese potato? Or Fajita potato, depending on your seasonings? I definitely can...
-Ground beef seasoned with salt and pepper, bacon, and cheese. Burger and a side of fries all in one crispy starch boat? I can dig it.
That is really all of my crazy shenanigan ideas for the moment on these potatoes.
Happy crafting! Pin It Now!
Monday, January 21, 2013
Table of Contents
Ok. I have no pictures. That is true. But if I do not get to sleep soon I am going to probably fall over. So, as a peace offering, I bring you this super handy thing I discovered.
You probably already knew it.
If you use an actual table to create your table of contents, it is MUCH simpler to get all of the numbers to light up. I make two column tables, pull the center line far over to the right to make small boxes for my numbers, and then type the sections out in the larger boxes. Then I just fill the space with periods or similar to draw the eye over to them.
Sounds simple enough, but I am not done. If I have specific sections I will delineate them by adding in an extra line for the title of that section (think equivalent of chapters). I will make that entire line a very pale gray to help set it apart.
And finally, I go up to design in the tables tab of word and I set the borders option to "no borders". Then, it looks like I created this really fancy table of contents that has stellar alignment and designated sections....
Fake it til you make it, right?
Anyways, I will come up with something cool tomorrow. As far as I am concerned, this is crafty enough.
Happy crafting! Pin It Now!
Sunday, January 20, 2013
Cheap and Easy Display Case
My friends had a lot of baseball cards that they wanted to display. Actual baseball cards displays can be expensive, so my best friend asked me what I would suggest doing.
Now, mind you, she asked me when my car was broken down and I was in somewhat of a flustered mood. However, she knows me all too well and knew I couldn't resist an opportunity to brainstorm some solution.
Here were a few of my ideas:
-A shadowbox with velcro backing, and velcro dots on the back of the plastic baseball covers to arrange them in a large collage.
-If a shadowbox with velcro could not be located, putting cork or foam board in a shadow box or display case and hot gluing tacks to the back of the covers to create the collage.
-Attaching magnet strips to any backing and the back of the covers to use in a poster frame or other inexpensive solution, OR attaching business card backs to the covers and using a metal pan with a lip (spray painting the lip black or similar) as the shadow box itself to create a collage.
She probably got 20 texts over the course of an entire conversation as I kept thinking of different ways it could be attached.
 They opted for a large poster frame, which is a great solution for this because you can find poster frames at very budget friendly prices. Rolls of magnet strips can almost always be found in craft sections of stores or in office sections.
The magnets can be attached directly to the backing that comes in the frame, meaning even less you have to purchase in the first place.
 The visual of the strips through the sides of the covers also adds an extra layer of design without any extra work. That, is my kind of solution. It would be so easy to switch out the cards if need be and rearrange this as needed.
This would be a quick and easy way to make a versatile and easy to change family photo collage as well, with all pictures or slots of pictures mixed with decorative paper.
Happy crafting!
Pin It Now!
Now, mind you, she asked me when my car was broken down and I was in somewhat of a flustered mood. However, she knows me all too well and knew I couldn't resist an opportunity to brainstorm some solution.
Here were a few of my ideas:
-A shadowbox with velcro backing, and velcro dots on the back of the plastic baseball covers to arrange them in a large collage.
-If a shadowbox with velcro could not be located, putting cork or foam board in a shadow box or display case and hot gluing tacks to the back of the covers to create the collage.
-Attaching magnet strips to any backing and the back of the covers to use in a poster frame or other inexpensive solution, OR attaching business card backs to the covers and using a metal pan with a lip (spray painting the lip black or similar) as the shadow box itself to create a collage.
She probably got 20 texts over the course of an entire conversation as I kept thinking of different ways it could be attached.

The magnets can be attached directly to the backing that comes in the frame, meaning even less you have to purchase in the first place.
 The visual of the strips through the sides of the covers also adds an extra layer of design without any extra work. That, is my kind of solution. It would be so easy to switch out the cards if need be and rearrange this as needed.
This would be a quick and easy way to make a versatile and easy to change family photo collage as well, with all pictures or slots of pictures mixed with decorative paper.
Happy crafting!
Pin It Now!
Saturday, January 19, 2013
Tractor Cake

We melted colored candy melts and made tractors in some of the most tractor-y colors we had. My mom agreed to let me do this cake myself, which was a blast. For an easy piping around the top of the cake, I basically just did regular and upside down U's that connected into each other to create a rope. On the bottom I did shells. Up the corners I did forward and backward C's. I like to explain things in completely non-cake terms, after all.
Regardless, cocoa and powdered sugar were mixed together and sprinkled on the cake to make a dirt mound, and green stars formed the second mound. An army of chocolate tractors and letters to spell his name were placed on the cake. On the sides, I used a lighter green and a grass/hair tip and put a tractor on each side as well.
A set of happy birthday candles later and this cake was ready to go. My mom likes these candles because with as little time as candles are lit, they are perfectly reusable.
Happy crafting! Pin It Now!
Friday, January 18, 2013
A Savory Filled Roll Story

-3 C AP Flour
-1.5 C Water
-1/4 tsp yeast
-1.5 tsp salt
-1 tsp basil
-1/2 tsp rosemary
-other herbs as desired
Filling*:
-1/2 block cream cheese
-1 container Greek yogurt
-1/2 C sliced cherry tomatoes (or diced any other tomato)
-4 TB pesto
-1/4 C chopped spinach leaves
-Handful of craisins
-1 C mozzarella cheese
-Salt and pepper to taste

I also used the remaining half (or slightly under) of the dough I had used for my pizza. So, if you don't want leftover dough and are starting this from scratch, halve the recipe. Anyway, mix all the dough ingredients together and let it raise overnight. I let mine raise in my gas oven because it is warm in there. My apartment is hit or miss. Let the dough rise about 12 hours (overnight) and then let in sit in your fridge a day or so. That part is optional but it does develop nice flavor as it sits in the fridge.

This is where you will veer from what I did. I love dark nonstick pans. I love them, they are amazing, I adore using them. So how in the world I ended up with my round glass dish for this part I have next to no idea. I momentarily lost brain function I suppose. You will use your 13x9 inch pan and not have to bake these nearly as long.
Unless you are patient, in which case maybe you will use glass as well.

I baked these at 350 for right under 50 minutes. At first I could not fathom why they were taking so long to get done...THEY ARE THE EQUIVALENT OF CINNAMON ROLLS FOR CRYING OUT LOUD. I knew that having a filling like this one that was cream cheese based would add some time, but this was getting ridiculous. And then I realized my error. I hate baking in glass. One time I tried to bake brownies in a glass pan because that was all we had easily accessible back in my dorm days, and they just really never got the same kind of done that brownies really get. I was so frustrated.
I love glass dishes for roasting meat and veggies together. And meatloaf! They are great for meatloaf. But I would REALLY like to suggest putting these rolls in a metal baking pan. In which case, I would start checking them around 25-30 minutes. I make my actual no knead bread anywhere between 30-40 minutes depending on what temp I am baking it at, so that is what I draw my suggestion here from, as well as glancing over other filled roll recipes. It could certainly take longer if they are touching each other like they were in mine, so an exact time is going to vary on a lot of things.
But, I tried them, and THEY ARE DELICIOUS! I am very happy.
But I have not determined a real name for them yet. I have to work on that.
Happy crafting! Pin It Now!
Thursday, January 17, 2013
Lemon Poppy Pancakes

-1 C pancake mix (Krusteaz)
-1/4 C Lemon Juice
-1/2 C Milk
-1 tsp lemon extract
-1 tsp poppyseed
-Zest of lemon (some)
Glaze
-1/2 C powdered sugar
-Dash of Milk
-Couple squirts of lemon juice or lemon extract if you are like me and used all the lemon you had in the pancakes
You know the drill, you mix, you cook, you butter, you glaze, you EAT!
Why anyone makes plain pancakes I will never understand. I have just about as much fun scheming up pancake flavors as I do eating them. I tried these pancakes both with syrup and with a glaze. The glaze definitely won. If you had some yummy lemon infused honey that would also be an option.
I think these would also be good with a berry compote on them. I like berries with lemon things. OR a raspberry sauce. That would be really tasty as well.
I prefer lemon poppy seed to regular lemon things. Lemon cake is cool, but lemon poppy seed cake is AWESOME. Same for pancakes. Lemon would be nice, but lemon poppy seed is PHENOMENAL. Plus, how many times do you really taste a light, refreshing pancake?
Name one time.
Seriously, name one. They are always heavy and a lot of them just taste heavy. Why? Why are we so insistent upon making a pancake taste even heavier? It is already pretty dense compared to other things. It isn't as crispy as a waffle. It is not as delightful as stuffed french toast. We are furthering the disadvantage of a pancake by weighing it down.
Alright, so that was only a half serious rant, but it has some truth to it.
Happy crafting! Pin It Now!
Wednesday, January 16, 2013
Homemade Stuffed Crust BBQ Chicken Pizza
 Dough:
-3C AP Flour
-1.5 tsp salt
-1/4 tsp yeast
-1.5 C lukewarm water
-1 tsp Basil
-1/2 tsp Rosemary
-1-2 tsp of garlic cheese topper
Pizza
-Dough (clearly)
-String cheese (3-5 sticks, more if larger pizza)
-Mozzarella and Colby jack cheese, shredded
-1 Chicken tenderloin (more if desired or very large pizza)
-1/4 c frozen corn
-1 ring of an onion, chopped
-1/2 sweet red pepper, chopped
 -4 TB BBQ sauce for cooking chicken, plus more for drizzling on pizza
At least one night before you are going to make pizza, prepare the dough. You may need a little extra water. Mix all the ingredients together, it will form a sticky shaggy dough. It is the same no-knead style dough I use for everything. If you have a different kind of dough you like, use it. Let the dough sit overnight and raise. Pop it in your fridge the next morning until you are going to use it. A day or two in the fridge will allow it to develop flavor, but you can use it as soon as it has raised if you prefer.
Preheat your oven to 400F. I used half of the dough the recipe uses to make this pizza, and will be using the rest for another foodie venture. You can cut the recipe down if you don't want leftovers. Turn the dough you are using out onto a floured surface, dust it with flour, and roll or stretch by hand to the desired thinness.
 Dust a pizza pan with cornmeal and plop your dough on it. Let it rest while you cook your chicken. Add a little pat of butter to a skillet, add your onion, pepper, and chicken. Season with seasoned salt, pepper, and add the BBQ sauce. A few minutes before it is done, toss in the corn. Cook until everything is done.
Line the rim with string cheese sticks and roll the edges over them. I tore mine in half lengthwise, you can add them in however you like. Top with sauce and the chicken skillet mix, and add your cheeses. Drizzle BBQ sauce over the cheese. I put some in a ziplock bag and cut the tip off so that I did not risk pouring a large amount on accidentally.
Brush the crust with butter or olive oil and add a little extra garlic cheese topper. I used olive oil, but next time will certainly use a little melted butter instead. I may even buy a brush.
Bake the pizza at 400F for about 20 minutes.
The next time I make this pizza, it will come as no surprise that I am going to add bacon. In fact, I encourage you to add bacon before you ever make it without. It would ROCK with bacon. I also wish I had put more BBQ sauce on top of my pizza. That is what the dark dots are on the pizza in the picture.
I also wish I had Sweet Baby Rays BBQ sauce, instead of what I had, but it is still a decent sauce. I just prefer a stronger, honey BBQ type flavor.
The herbed pizza crust was delicious, and the cornmeal helped it get crispy. I noticed later that the string cheese I bought was Light string cheese, so that probably would have tasted a bit better as something else.
I have many, many schemes for new flavors and more shenanigans, including some for the leftover dough in my fridge.
Happy crafting!
Pin It Now!
Tuesday, January 15, 2013
Tortellini Pasta Salad with a Creamy Italian Base
Let me start this off by saying, I hate pasta salad. Or at least, typical pasta salad. It always tastes odd to me. But, I started thinking earlier today about things I do like, and other types of "salads" that I find delicious. I was looking around my fridge, remember a recipe I had made before, and soon enough I had myself a WINNER. This pasta salad starts with Greek yogurt, instead of your typical mayo base that other creamy salads have. The ingredients may sound a little odd when you first read them, but trust me, they blend beautifully.
 Ingredients:
-1 6oz or similar size container of plain Greek yogurt
-3 TB pesto (I use Buitoni, I don't have a food processor to make my own...yet)
-1/2 C or so of mozzarella cheese
-1/4 C diced tomatoes or cut cherry tomatoes (I used slice cherry tomatoes)
-Dash of salt, pepper, and garlic
-1/4 C Craisins (aka I used a grab of them haha)
-Sprinkling of Real Hormel Bacon Bits (not that Bac-O junk)
-Optional addition of chopped fresh spinach leaves and whatever else your heart desires
-Tortellini or pasta, about 1-2 cups depending on size of noodles and how heavily sauced you are looking for, details to follow
I cooked my tortellini, probably the equivalent of 1.5-2 cups of it. I divide the big packs from SAMs into some smaller bags and I really don't know how much are in the bags right off the top of my head. But it is pretty close to the serving size. Mix all the remaining ingredients in a bowl. Drain your pasta when it is done and then run in under cold water so it is not burning hot on your dressing. Toss it with desired amount of dressing, I had probably about 1/3 of mine leftover. Taste and adjust salt and similar as needed.
This made about 2 servings of pasta salad for me. It made one big meal portion and I have enough leftover I could easily snack on it or use it as a side. You can add more pesto if you want a stronger flavor, I did not because my pasta is herbed as well. I understand that the craisins sound like an odd addition, but I would highly recommend not tossing them out. Chicken salad has grapes in it. This pasta salad has craisins. It all makes sense.
This flavor profile started a year ago when I made an Italian cheeseball, crusted in pistachios, on a whim. I don't really recall what got the idea in my head, but it was phenomenal. I did not have the craisins on that cheeseball that time, but I did spread the cheeseball on little bits of toast and topped it with craisins. I was sold. If I had to do it again, I would probably put the craisins mixed with pistachios around the side of a cheeseball.
I also, for that cheeseball, had roasted my cherry tomatoes instead of just directly putting them in. I usually do this by drizzling a little oil over them, topping with a sprinkle of basil, garlic, pepper, and salt and baking at 350 for 30 minutes or so. That would also be an option for this pasta salad.
I am always looking for new things I can take with me to lunch because I don't like to eat on campus everyday. This pasta salad gives me another option, and I will be using the leftover "dressing" in wontons. I may add a half of a block of reduced fat cream cheese and a little more pesto to make it go further as a filling, but it will most certainly not go to waste. You can also use the remaining dressing as a spread on a tortilla shell and top it with ham. Delicious.
Happy crafting! Pin It Now!
Monday, January 14, 2013
Overtime: The Movie You Need to Watch

I saw this movie when I went to my first horror film screening. We got into the room where they were showing the films a little early, and we saw the end of the one that showed before this. It was not the best film I had ever seen, and I was a little worried about what Overtime would be like. I looked at my sister and gave her one of those "where the heck have you brought me" looks.
However, as soon as the film started, I was blown away. I leaned over to my sister and said "omg it looks like a real movie!!" because the previous one had not. As soon as the movie itself started, I was completely hooked and entertained the entire time. And I am picky on movies. The movie, in my opinion, is an action/thriller type flick. It does have somewhat scary undertones in the creepy zombie/aliens, but it is way too awesome to just be called a scary movie.
For a very quick overview, the main characters have some business to take care of for their boss pertaining to a drug dealer and a drug smuggling plot that just keeps getting bigger. However, when they go to track down this guy they end up in way more trouble than they bargained for with some non-terrestrial issues underfoot. They basically have to get in, save the world, and be back in time for cake at a birthday party. That is, if they remember the cake.
The entire movie is full of action, is incredibly funny, and will keep you more than fixated the entire time. It has the stamp of approval from my boyfriend, who is also picky on what he considers a quality movie, and you definitely need to get your hands on a copy. I got mine from amazon.com, but you might be able to find it at your Wal-Mart as well, among other retailers. The point is, do whatever it takes to get your copy, because it is well worth your time and money, and you will be watching it multiple times.
I consider this a public service announcement to bring you news of the best new things I find. You are welcome.
Happy crafting! Pin It Now!
Sunday, January 13, 2013
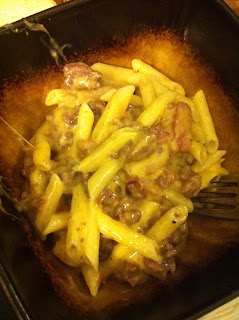
Bacon Cheeseburger Pasta
Now, I don't normally like to brag. However, I will make a very slight concession in this for two statements. First, I have the most fantastic boyfriend a girl could ask for, and second, my bacon cheeseburger pasta is what Hamburger Helper dreams of being when it doodles on its notebook in class all day. How do I know this? One simple statement: best friend tested, boyfriend approved. I have a very picky best friend when it comes to food. So, when I run something across her radar that she not only likes, but she cooks herself later, I know I have am on to something. Here we go:
 Ingredients (for at least two servings of the dish)
-1/4 lb 90/10 sirloin ground beef (I highly suggest sirloin)
-3-4 strips of bacon, diced (and/or Hormel Real Bacon Pieces)
-1.5+ cups of pasta (I like penne for this, bow ties could be fun!)
-1/2 block of Colby Jack cheese, shredded (I really prefer 1/4th of the Tillamook Colby Jack blocks from SAM's, but use your favorite brand. And as usual, no bagged pre-shredded plastic cheese junk!)
-At least a couple tablespoons of milk, more as needed
-Salt and pepper to taste
Drop your noodles in salted water and get them boiling. I don't oil my water or anything like that when I have something that is directly going to go on them. The amount of noodles you should use depends on the ratio you want. The one I stated above will give you a lot higher beef:noodle ratio than what most normal versions of this recipe probably would, so don't be afraid to increase it. I happened to be in a carnivore mood when I made it.
While you are cooking them to your desired done-ness (I don't time mine, much to the effect of driving my mom insane when we cook, but I taste them when they start to turn opaque and adjust the remaining couple of minutes as needed), heat a skillet and put in your ground sirloin and bacon pieces. Add salt and pepper to taste, I suggest seasoning salt. I did not drop my bacon right when I did the beef, and I wish I had. It could easily have cooked that entire time and been just fine. If you want, you can replace the bacon here with Hormel Real Bacon Pieces in the pasta later. I make it both ways, and sometimes I combine them and use both, as I did in this one.
 Drain your noodles when they are done, leave them in the strainer, and drain the beef/bacon over them. Shake off any excess liquid, lower the heat on your burner and put the noodles/bacon/burger mix back on the stove on lower heat and add the cheese. Start to mix it around, and when it begins melting add some milk and the bacon pieces if you are using Hormel. You don't necessarily have to add milk, I have made it before and not done so, but by adding milk you get pasta in more of a cheesy sauce instead of just with melted cheese on it. Taste your pasta and add more salt if necessary (make sure you taste a bite with bacon so that you don't over salt the dish).
If you don't want to use milk but still want it to be creamy, look to something such as sour cream for the answer. It is really good in mac and cheese, and would work here in this dish as well. I have a hard time getting through a jug of milk, and a very easy time going through sour cream, so you can see why I use what I do.
You could barbecue the burger or add a little ketchup while you are cooking it for a completely different flavor profile. I love to deconstruct things and make them something else (chicken soft tacos in a chicken tortilla soup, for example) so consider this pasta just a deconstructed burger. Like tomato on your burger? Add in diced tomato. Like a different cheese? Mix and match or switch it out completely with something else.
That isn't pre-shredded plastic cheese. Or Velveeta. Real cheese only for anything involving sirloin.
Haha.
To me, buying Hamburger Helper is paying extra to buy a box of things you have better quality versions of already in your home. You probably have noodles. You most likely have cheese that is not a creepy powdered form. You have salt and pepper. You should buy seasoning salt if you don't have it. You have milk. And you would have had to buy the beef anyway. So as always, my suggestion is do it yourself and do it better.
Happy crafting!
Pin It Now!

-1/4 lb 90/10 sirloin ground beef (I highly suggest sirloin)
-3-4 strips of bacon, diced (and/or Hormel Real Bacon Pieces)
-1.5+ cups of pasta (I like penne for this, bow ties could be fun!)
-1/2 block of Colby Jack cheese, shredded (I really prefer 1/4th of the Tillamook Colby Jack blocks from SAM's, but use your favorite brand. And as usual, no bagged pre-shredded plastic cheese junk!)
-At least a couple tablespoons of milk, more as needed
-Salt and pepper to taste
Drop your noodles in salted water and get them boiling. I don't oil my water or anything like that when I have something that is directly going to go on them. The amount of noodles you should use depends on the ratio you want. The one I stated above will give you a lot higher beef:noodle ratio than what most normal versions of this recipe probably would, so don't be afraid to increase it. I happened to be in a carnivore mood when I made it.
While you are cooking them to your desired done-ness (I don't time mine, much to the effect of driving my mom insane when we cook, but I taste them when they start to turn opaque and adjust the remaining couple of minutes as needed), heat a skillet and put in your ground sirloin and bacon pieces. Add salt and pepper to taste, I suggest seasoning salt. I did not drop my bacon right when I did the beef, and I wish I had. It could easily have cooked that entire time and been just fine. If you want, you can replace the bacon here with Hormel Real Bacon Pieces in the pasta later. I make it both ways, and sometimes I combine them and use both, as I did in this one.

If you don't want to use milk but still want it to be creamy, look to something such as sour cream for the answer. It is really good in mac and cheese, and would work here in this dish as well. I have a hard time getting through a jug of milk, and a very easy time going through sour cream, so you can see why I use what I do.
You could barbecue the burger or add a little ketchup while you are cooking it for a completely different flavor profile. I love to deconstruct things and make them something else (chicken soft tacos in a chicken tortilla soup, for example) so consider this pasta just a deconstructed burger. Like tomato on your burger? Add in diced tomato. Like a different cheese? Mix and match or switch it out completely with something else.
That isn't pre-shredded plastic cheese. Or Velveeta. Real cheese only for anything involving sirloin.
Haha.
To me, buying Hamburger Helper is paying extra to buy a box of things you have better quality versions of already in your home. You probably have noodles. You most likely have cheese that is not a creepy powdered form. You have salt and pepper. You should buy seasoning salt if you don't have it. You have milk. And you would have had to buy the beef anyway. So as always, my suggestion is do it yourself and do it better.
Happy crafting!
Pin It Now!
Saturday, January 12, 2013
Picklace

I also just happened to have a green guitar pick from the days after I won a guitar that I thought I would learn how to play. I still haven't quite really started that yet (haha) so I thought this pick would find a much better home with him.
Now, I don't like to ruin things that could ever potentially be useful or needed again. I could have popped a hole in this or E6000 the heck out of it, but that is quite unneeded when you have an army of wire to choose from. I chose a bronze wire to keep in the usual steampunk style color schemes of bronzes and blacks and metals all together. I always start my bails by doubling the wire and making the middle section the loop that will hang it. Then it is just a matter of going around the sides or corners of something to until the wires are crossed enough so that it will stay.
Also, I wanted to throw in a nod to a song that is pretty special to both of us, which is Coheed and Cambria's song Pearl of the Stars. It is really an excellent song and one we both like really well. I had star earrings from back in the day that I took apart and used an extra pearl from my beading box. I attached them to each other also with bronze wire so that it would all blend in.
I have had a pretty fantastic weekend and it has been finished off with some delicious chicken tortilla soup (yes, my verdict is you must add rice to chicken tortilla soup it is the only way the world will make sense) and some rain. Really now, what else can you ask for? I happen to love BOTH.
Make meaningful jewelry, it wears better.
Happy crafting. Pin It Now!
Friday, January 11, 2013
Chocolate Buttercream Iced Brownies

And, I really wanted chocolate. Which is rare for me. And my boyfriend is coming over. That had nothing to do with it of course...
Regardless, I made these with a mix. I never mind using brownie mix because I really like the flavor of it and it is usually pretty cheap. This was plain o' Betty Crocker Fudge Brownie Mix, which is pretty much my favorite kind.

Whew, close call there.

It has long been my theory that many things can be solved with butter. And so I got out my handy dandy smaller blue mixing bowl and went to work:
-1/2 stick butter, room temp
-1 TB cocoa (Hershey's)
-1/5-2 Cups powdered sugar depending on how stiff you want the icing to be,
-1 tsp Vanilla
Random side note, I just bought Rodelle Vanilla at Meijer because their plant uses wind energy and supports eco friendly ventures. I think that is pretty darn cool. I would have rather had clear vanilla, but the odds of me making anything that brown vanilla will even make a difference in are slim.
Anyways I mixed the butter with the cocoa first, then added the powdered sugar and the vanilla. You can really add as little or much powdered sugar as you like, you will just need to add a little water if you add a lot and it gets to stiff or won't mix in.
The number of times I mix things by hand are slim, yet for some reason things involving brownies almost never entice me to break out the kitchenaid. Ask me to mix cake pops, on the other hand, and it is the first thing I plug in. I made my icing stiff enough to pipe and did my mom's usual trend of putting some design down the diagonal of the brownie with dots on the other corners.
I don't think brownies need a sickening amount of icing on them, so I like to roll with this method too. And, since my guy likes Reese's cups, I was that nice girlfriend and put them on as well. I have found that the best way to keep friends, and subsequently boyfriends, is to be nice now and then. Earth shattering, I know.
And I have a few brownies that wouldn't fit in the tray in my freezer to eat the next time I have some delicious homemade ice cream!
Happy crafting!
Pin It Now!
Thursday, January 10, 2013
Meatloaf-tovers.

I have been pretty hooked on 90/10 since I tried it. I do use the leaner stuff now and then, but the sirloin tastes a million times better with really not all that much extra fat. I don't like to use 85/15 all that much, as I don't like a lot of grease production unless we are talking bacon in which case grease is fine. I don't even consider 73/27 when I am shopping for meat.
 The problem is, no matter what I do, I always have leftovers. I have gotten it down to being able to pretty much eat all of these meatloaves over the course of a couple days because they are about a third of the size of normal. Maybe a little taller but about the same length as a great sized baking potato.
It occurred to me one day that people eat meatloaf sandwiches. I had never had one but I watch the food network and other shows enough to know they exist. So I tried one last semester with some leftovers, and sure enough it was DELICIOUS. Now, for those of you who are skeptical of this, consider a meatloaf sandwich to be a glorified burger.
I determined today it was a glorified burger, and a winning combination of toppings followed. My recipe for a perfect meatloaf sandwich now is:
 - 1 slice or pieces of a slice of meatloaf (about 1/2 inch or so thick
-a relatively thin slice of GOOD QUALITY colby jack, meaning from the block and not shredded. I got Tillamook cheese from SAMs Club and it is pretty fantastic.
-ketchup and mayo
-2 slices of bread, toasted
I have decided that the toasted is non-negotiable unless you have to store it in a lunchbox all day. You can warm the meatloaf up or not, I never do. It is actually really delicious cold. Meatloaf has a much smoother texture than a burger because it is mixed with other things and I cannot stress enough that sirloin beef will change your meatloaf life hahaha. Ok fine, maybe it won't, but it most certainly changed mine.
Like I said, it was deciding that it was a glorified burger that prompted me to include add ons. I would not be surprised if at some point I put bacon on one of these sandwiches. THAT...would be amazing.
And maybe frisco sauce from Steak n Shake....
Anyway I wrapped this little guy up in the paper towel and took it to go as I was unsurprisingly running late to my class. Something about 1230 classes does not work for me on getting out of my apartment very early. Luckily, late to me is walking in 3 minutes before class starts, so everything works out just fine.
I am always looking for better things to take for lunch. My body can't run all day on PB&J anymore, it has sadly figured out that I am not still 7...what a buzzkill. As I don't like to hunt down microwaves on campus, anything that can be taken cold is a major plus as far as I am concerned. I don't enjoy lunch meat too much, so I have to get pretty strategic on food, or eat on campus.
And there are only so many days in a row you can eat on campus.
DON'T SKIMP OUT ON CHEESE QUALITY! :)
Happy crafting.
Pin It Now!
Wednesday, January 9, 2013
Strawberry Pancakes

-1/3 c of strawberries, cut up into small pieces and refrigerated overnight with 2 TB sugar and a little lemon zest
-1 container of Mott's Strawberry Applesauce
-3 TB milk
-1 C Krusteaz pancake mix
-2 second squirt of honey
Mix all the ingredients, butter a griddle, and use a 1/4 c measuring cup to pour the batter out. Cook them on a few sides each and serve them up with maple syrup or your choice of topping.
 I don't have much interest in plain pancakes. I don't have much interest in plain anything, I have come to the realization. Plain pancakes have been done a million times over. Some people tell me that they prefer the regular ole buttermilk ones, I would argue this is because they haven't tried really perfect pumpkin ones.
 I would suggest not leaving out the zest in these. It really brightened them up. I zested 3 different spots on a lemon until I was happy with the amount that was on the berries. A little dash of lemon juice is also fine, it helps the berries start juicing without needing a ton of sugar.
When I make these again sometime, I think I also might put a tiny kick of ginger in with them. I really like ginger and blackberry together, enjoyed it in my blueberry pancakes, and so I assume I would like it in these as well. It just gives them a little extra depth.
I like depth. In pancakes, and humans.
Ironically, I have never made normal, plain pancakes and have very little desire to do so. If it doesn't have some added fruit benefits or the protein from Greek yogurt or peanut butter then I might as well eat a cupcake for breakfast, as far as I am concerned. WHICH I would rather have a cupcake over a plain pancake any day.
Pancakes make really good snacking food throughout the day, in my opinion.
Happy crafting!
Pin It Now!
Tuesday, January 8, 2013
Sweet Tooth Swaps

I also cook with butter in just about every meal. My coworker constantly asks me how I stay 90 pounds, which is ridiculous because I am usually between 145-150 at 5'7". Boys are terrible at guessing weight.
But he did give me a good idea for a blog topic. As many people are starting weight loss ventures for the new year, I wanted to offer what limited advice I can, but more importantly tip you off to some very tasty alternatives to your typical sweet tooth craving.
Stop reading my blog right now, go to the Republic of Tea's website, and start shopping. I don't even like chocolate, right? You could put a plate of chocolate chip cookies in front of me and I might take a bite of one but I will make the most horrible face. However, the Strawberry Chocolate Tea that RoT has is one of the most phenomenal things I have ever tasted. I bought a cup at the bookstore during my undergrad, and I have never regretted that day. RoT is actually the only brand of tea I will buy and drink, because they have NEVER let me down.
The Vanilla Almond Tea tastes like a cookie, if you are stringently against chocolate, and the Honey Ginseng Tea remains one of my all time favorites. Panera Bread (around here at least) has the Honey Ginseng Tea and an also delicious Ginger Peach Black Tea (must brew for no less than 5 minutes as it is a black tea, I go 6 sometimes), I suggest trying it. I brew all my teas at around 5 minutes, put in 2-4 packs of sweetener depending on how big the cup I brewed, and sometimes I add in honey. Tonight, I made a large cup of Strawberry Chocolate Tea brewed for 5 minutes, with 4 packs of equal and a 4 second honey squirt. Hello dessert! They have a red velvet tea I am dying to try as well.
Do you like yogurt? I do. And over break, my mom stumbled upon a phenomenal new yogurt. Mueller yogurt in Luscious Lemon (I believe that is the flavor name, point is look for lemon) has a top notch flavor and a really awesome texture. I found it at Meijer, I am not sure how far its reach is just yet. There is a lemon mousse on top of super creamy yogurt. Their passion fruit flavor is also good. The lemon, however, is perfect.
If you are lucky enough to live by a supermarket that sells it, which I never seem to be, PLEASE go buy Chobani Champions yogurt in Orange Vanilla. The orange flavors in it are insanely natural and it is like someone poured orange juice into greek yogurt heaven. The yogurt itself is a little sweeter and creamier, as it is specifically geared toward kids. The cups are smaller as well. Greek yogurt is packed with protein, so I would suggest giving the Champions a go, even if you usually don't like the texture of Greek. The champions might just surprise you. The very berry is also rather tasty. Chobani is rolling out new flavors and new product lines, so be on the lookout!
Another really great way to come up with a quick dessert is to mix light or fat free coolwhip (or homemade equivalent) with Chobani Lemon Greek Yogurt. You could make a refrigerator pie out of this and no one would complain. I would like to put it on top my lemon lighty cupcakes, which I use 1 box of lemon cake mix with 1 container of chobani lemon, mix and bake. Those cupcakes were delicious, and no one would know they had Greek Yogurt in them.
Let me just pause for a minute and say the #1 rule of cooking or baking with Greek or any other substitute is to not tell people. People are always super negative, in my experience, about trying a healthier version of anything and are just overall pessimist parade rainers. Which sometimes is good, because it means more for me, haha. But I have swapped out half the cream cheese for greek yogurt in a pumpkin cheesecake before, and my dad never knew the the difference. So don't listen to the doubters. Fool em!
In my opinion, the most important thing to making a diet work is to eat what you want, but in small and smart quantities. And timing is everything. You shouldn't stop going to Cheesecake Factory because you are trying to trim down, but you also probably shouldn't go there every week. And when you do go there, plan for leftovers. Order that delicious cheesecake in a box and take half home. Or split one. I know a lot of times I have tried to swear off this thing or that thing, and all it does is make me binge out on it someday when I am down (I'm looking at you, Potato Chips!). When you get stressed your ability to resist those things you swore off become drastically reduced, in my opinion.
I also think life is too short to not eat good food, so that is why I would suggest portion control over anything else. I can't live my life on preservative filled Lean Cuisines.
Gross.
Clear broth-style soups can also be a huge help. Most of what fills you up is a liquid, which is always a plus. Clear broths are usually less fatty than their creamy counterparts.
Random side note, I got really sick last year during the last of my undergrad and my throat was so swollen it was nearly shut. I could not swallow anything solid, the doctors put me on Z pack, and for about 2 full days I lived on chicken noodle soup broth (could not even get the noodles down because it hurt too bad) and Special K French Vanilla Protein shakes. Now, don't get me wrong, I don't ever want to have to do that again, but it did some serious work on getting my metabolism in full out panic mode.
Don't like protein shakes like that? Try the French Vanilla protein shake on a bowl of Vanilla Almond Special K cereal. Trust me. Those protein shakes make excellent milk substitutes when it comes to the morning munchies.
I consider this a craft of the day, because with every sip of this Strawberry Chocolate Tea it is apparent that it is perfectly crafted. I really just cannot express how good this tea is. You can also order sampler packs that you pick yourself from Republic of Tea, so try a lot of flavors! I have even tried odd flavors like blood orange cranberry and wild blueberry, and they were both delicious!
But, to whoever made the Dragonfruit and Lychee Green Tea that the cafe at school had for a semester...please start making it again and end my internet searches...
Oh...right...
Happy crafting!
Pin It Now!
Monday, January 7, 2013
Freezing Sauce

I am not cool with mold.
 I have frozen alfredo sauce and pesto (usually 1 part pesto to 1 part sour cream or greek yogurt because that is how I prefer to put it in pasta dishes to make it go farther) in little containers multiple times with really good results. However, I hate using up my little containers, and don't have enough to do small portions of all of the sauces that I like to use. Also, I have to thaw the sauce completely with this method before I use it to get it out of the containers.
 One thing led to another, and it prompted me to resign one of my ice cube trays to sauce duty. I currently have my pasta sauce freezing, I imagine it will take at least a few hours for them to get set, and then I will probably stick the whole tray in a ziploc bag. That way, I can leave them overnight in the tray without them just being out in the open in my freezer. Personal preference. Plus, by putting the entire tray in the bag, I will be able to crack it and dump the cubes out without having to touch them. I consider that even better.
Why is there a pasta picture here? Because making this pasta and opening the jar of Hunt's sauce is what prompted all of this. I sauteed mushrooms and cherry tomatoes in about a tablespoon of butter while penne was boiling. I put a little salt and pepper and about 1-1.5 tsp of garlic cheese topper on the veggies for a little added flavor. When they were cooked I put in some sauce and tore up spinach leaves to add in. I let it all sit there on low heat until my pasta was done.
First off, this was my Meatless Monday dinner, and it was great. Second, regular spaghetti is all great and good, but I eat with my eyes as much as anything else. Spaghetti with color and pizzazz? Right up my alley. Plus, why not throw a little extra kick of vitamins and healthy things in.
Back to the sauce cubes. They are 1.5 TB of sauce. Just for reference.
Happy crafting!
Pin It Now!
Sunday, January 6, 2013
Laid Back Waves: Overnight Hair

But what I am very good at doing is multitasking. My hair version of this is letting it fix while I SLEEP. Now that, is my kind of styling tool. Sleep.
So for this I section out the top 1/3 of my hair, bring the remaining hair to the sides of my head to keep it out of my way, and brush the section I will be working with backwards.
 After that, it is simply a matter of separating a small front section into thirds, putting a few braid crosses in it, and then continuing that pattern while pulling hair from the section.
After I get back to where my head starts to curve down in the back, I start pulling in hair from all the sides to finish it out into a full french braid. You could wear it out if you do it really neat.
Here are some tips:
In my experience, the best results come from hair being partially damp so it dries in the braid. I like to get out of the shower, leave a towel on my hair for maybe 5-10 minutes, brush out all the tangles, and then start. Sometimes, I even give it a little longer to air dry. A super wet braid will not dry by morning if your hair is like mine.
 You may also be wondering why in the world I sectioned off the top third only to do the top of the braid. I did this so that everything near the top of my head, all the way to my roots essentially is wavy and not flat. If I was going somewhere serious, I would probably braid all three sections separately to get the most body out of it.
You can spray a little hairspray on the braid when you are done if you want to. I usually do, very little so it doesn't get crunchy or difficult to take out.
Separating your hair in half and doing two french braids is also fine, but you will want to put a zigzag or curvy part in your hair. If you do a straightline part your hair will most likely hang with most of the part still visible. The zigzag pattern makes the hair fall back over itself when you take it out.

I usually only use hair spray on it next morning, just my normal herbal essence does the trick. Occasionally I will use mousse as well, but I find I don't often need it.
My hair does not scrunch like this if I wash it, blow dry it, and directly try to scrunch it by putting a ton of chemical on it like what works for other people. I can achieve this look by sleeping in braids or sleeping in a high messy bun (also starting with slightly damp hair), with slightly different results as to what the wave looks like.
I also very rarely will sleep in sponge rollers to get a head of massive curl and body. That is really hard to detangle later, so I leave that for very special occasions.
Happy hair fixing!
Pin It Now!
Saturday, January 5, 2013
Ginger Blueberry Pancakes

-2 cups Krusteaz pancake mix (or your own base)
-1 1/3 c of milk, plus a dash extra if it's dry
-1 tsp ginger
-1 3 second squirt of honey (for real, that's how I measure)
-1/4 c packed brown sugar
-1 cup of blueberries
Mash up some of the blueberries and/or slice some, and leave some whole. Mix all the ingredients together, add a little extra milk if it is dry. Taste the batter and add ginger to taste. Butter a griddle and cook.
Serve with real maple syrup because nothing else is acceptable, as far as I am concerned.
I cooked all my stuff on the same griddle, cooking the pancakes first and then the eggs and bacon. This got a little bit of blueberry on my eggs, but I am relatively ok with this. I had to get back in the pancake groove as I am heading back to college in the morning where I am making pancakes on a weekly basis.
I bought a bag of my favorite mix from Sam's...it makes 270 pancakes. That should hold me for a while ;).
Make smaller pancakes if you want easy flips, make sure the sides are fully cooked if you are making bigger ones. I tried to flip a big one far too soon...but at least it still tasted delicious hahahah.
I don't care if you are home alone or have a house full of guests, tasty pancakes are always the answer.
Happy crafting! Pin It Now!
Friday, January 4, 2013
My Sister's Peanut Butter Cake: Fun Decorating

My oldest sister made this cake for her husband's birthday. He LOVES Reese's Cups, as you can probably tell by this cake. So my sister made a chocolate cake with peanut butter icing.
Reese's Cups are between the layers, around the bottom like icing, and on the top as decorations. Chocolate was drizzled around the sides.
I don't have any recipes to offer, as this was not something I made, but I do think that this goes along with my recent theory of adding PIZZAZZ to things!
First, I am a big fan of adding things like coconut to the sides of cakes. It makes for very tasty decorations, and it means you don't have to get perfectly smooth sides. The same goes for finely chopped nuts, chocolate shavings, toffee chips, cookie pieces, whatever else you can think of!
Maybe it is a chocolate cake, with vanilla icing, and oreos crushed and covering the sides and between the layers.
Maybe it is a red velvet cake with extra red velvet crumbled and covering the sides.
Maybe it is a lemon cake with white chocolate shavings on the sides and raspberry jam on top.
Or maybe it is a caramel cake, with coconut on the sides and caramel/chocolate drizzled on top. Oh, man...that sounds delicious now that I think about it....
My point is, fun decorations and tasty decorations can be every bit as jaw dropping as tight fancy decorations. In fact, in some cases they might just go over BETTER! So have fun with birthdays and family events, and save the gum paste for those uptight occasions ;).
Happy crafting. Pin It Now!
Subscribe to:
Posts (Atom)