Monday, July 23, 2012
365 Days of Do
I have been pondering over the last few weeks of kicking off a 365 day personally challenge to do some new craft or cooking thing each day. I have started brainstorming ideas and have been debating on exactly what kind of challenge I want it to be. Here are my thoughts so far: I want to do a craft or food each day for the next year, I want it to be predominantly upcycled crafts and using things that I already have on hand. I think I may even try to go so far as to record how much it cost me, or approximate how much it would cost to do. I think that's always helpful to know.
This whole challenge idea has led to another conclusion. People should do something they love every single day. We all need to make more time for the things we love. You love to read? Try a chapter or half a chapter each night. Love to cook? Try something new whenever you can, and cook something each night. You love photography? That's a great one to do daily.
The point is, no matter who you are you can find something that you would love to do each and every day. Some people right now are probably thinking that they don't have the time...
God gave each of us 24 hours a day. Find the time. Find the time for you to be happy! We have to devote some to ourselves sometimes, but it doesn't mean that your special moment can't involve others.
I would totally include others on my 365 days of do should they want to join!
So for a short blog as a gear up to craft til my little heart is content, I leave with this. Don't be another person that falls into the ruts of society where life is a constant broken record, same ole same in and out day after day. Find the time to make each day special, because you only have a set number of them to enjoy. Color outside the lines and go beyond what has already been done.
Can't find a recipe for something you think would be good? Make one yourself.
Think you could make something better handmade? DO IT!
Rip in clothes? Fix it!
The possibilities are endless and the memories will be fantastic. Include your family in on it and make it meaningful.
And be prepared on August 1 for the kickoff of my 365 Days of Do!
And as always, forgive me for typing errors in this one, I'm blogging from my phone! Smaller screens wreak havoc on my accuracy ;).
Pin It Now!
Tuesday, July 17, 2012
Countertop Rehab
Once upon a time there was a hideous countertop. It looked like it was from the 80s or something and it needed a serious facelift. So it went to the DIY doctors and asked for a second chance at FABULOUS!
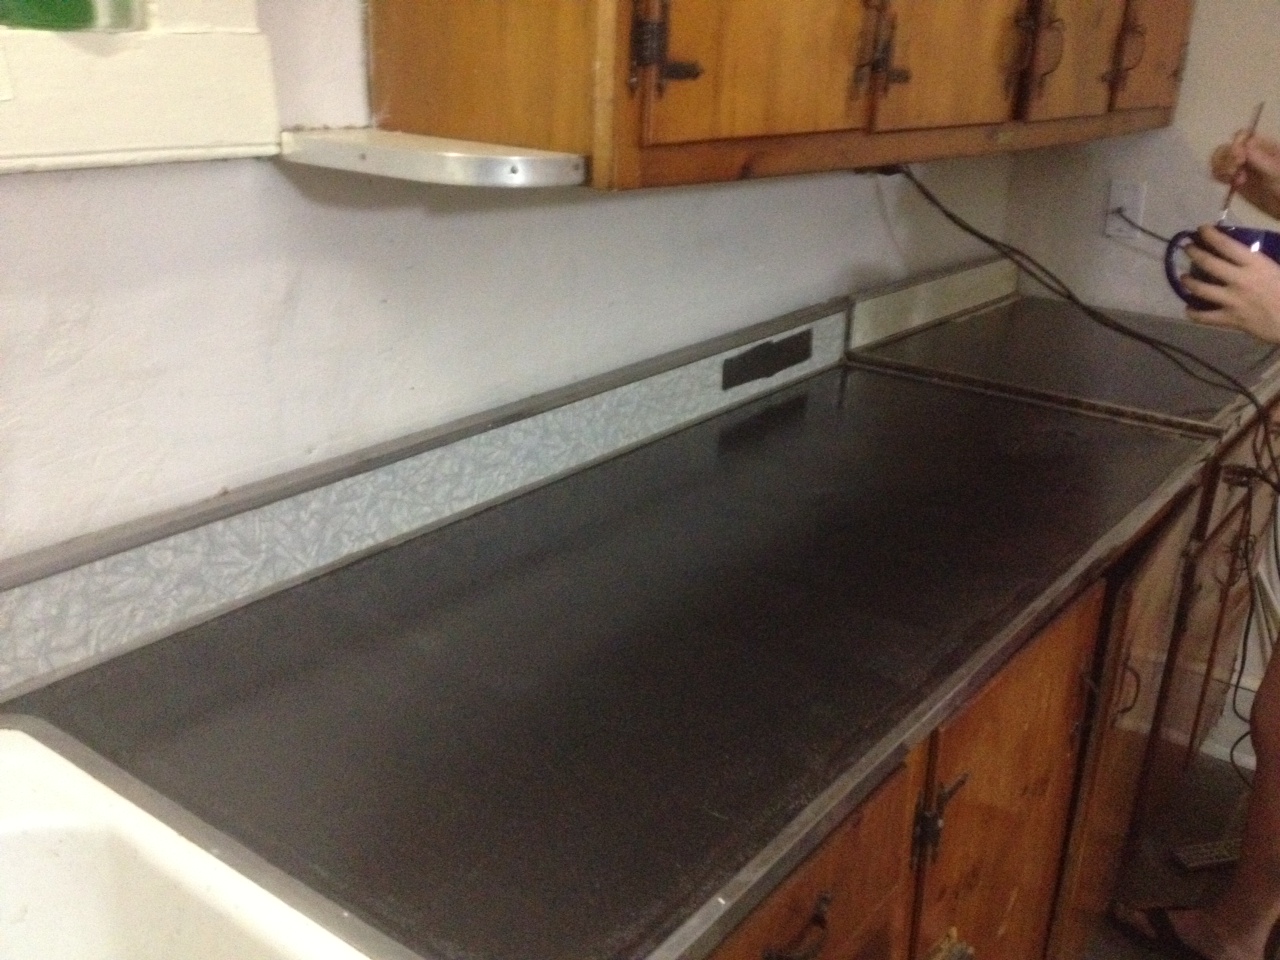
Creative, is it not? Meet our countertop:
 This is kinda a before and after at the same time. On the backsplash you can see the old countertop colors, a strange gray and white swirled pattern.
On the big part of the counter you see what we took it to.
We used Hammered Black Rustoleum Paint (can kind not the spray kind). Let me just say that if you use it you better have a window open because it is STRONG.
It also dries really quickly, so when you get it on the handle of your brush and you are like me and hate anything sticky you are probably going to flip out.
Anyway, we put one coat on it, and it looks a WORLD better. We left the chrome trim unpainted (ok fine except for where we did not see a drip...sue me) and so far have only done one coat. Now, places where we did the trim last and had some overlap you can tell that it is overlapped. It really doesn't look bad though, and probably would not be noticed by anyone but us.
We used an ultra smooth roller and a very small trim brush. It probably should have two coats to cover up any places that are thinner than others, but I dont think it is inherently necessary.
So, a $15 can of paint has saved us easily $150+ on new countertop.
I can dig it. Pin It Now!
Creative, is it not? Meet our countertop:
On the big part of the counter you see what we took it to.
We used Hammered Black Rustoleum Paint (can kind not the spray kind). Let me just say that if you use it you better have a window open because it is STRONG.
It also dries really quickly, so when you get it on the handle of your brush and you are like me and hate anything sticky you are probably going to flip out.
Anyway, we put one coat on it, and it looks a WORLD better. We left the chrome trim unpainted (ok fine except for where we did not see a drip...sue me) and so far have only done one coat. Now, places where we did the trim last and had some overlap you can tell that it is overlapped. It really doesn't look bad though, and probably would not be noticed by anyone but us.
We used an ultra smooth roller and a very small trim brush. It probably should have two coats to cover up any places that are thinner than others, but I dont think it is inherently necessary.
So, a $15 can of paint has saved us easily $150+ on new countertop.
I can dig it. Pin It Now!
Saturday, July 7, 2012
Vintage-ing A Map Onto Canvas
I am VERY excited about this DIY project I was finally able to accomplish. I love maps, am majoring in degrees where geography is everything, and love a good craft project. Last night I worked on breaking a map down and mod podging it onto canvases, as per something I had seen on pinterest. Then I opted to thrive on imperfections, and distress the heck out of mine as opposed to the pristine one I originally repinned. So here she is:
 Yes I know I should have rotated it before uploading it, but there is a good chance I am at work and we don't have any halfway decent picture managers loaded on the computers. So bear with me, and tilt your head.
It's good exercise for neck muscles anyway.
Now, some people would probably not like the amount of wrinkles that ended up in mine, I happen to love it. I think with the inky distressing and the wrinkles and the matte mod podge that it takes on a really old thrift store find look, instead of a $5 off ebay junkmap look.
So here is my double top secret "recipe" if you will for my map collage!
What you need:
Now, on to that rotating bookshelf I have been scheming over! Pin It Now!

It's good exercise for neck muscles anyway.
Now, some people would probably not like the amount of wrinkles that ended up in mine, I happen to love it. I think with the inky distressing and the wrinkles and the matte mod podge that it takes on a really old thrift store find look, instead of a $5 off ebay junkmap look.
So here is my double top secret "recipe" if you will for my map collage!
What you need:
- One 24x36 inch map in antique brown shades (eBay has them for around $5 often)
- Two each of the following canvas sizes: 16x20, 8x10, 4x5, 3x4 (I got all from hobby lobby for around $25, only using a 40% coupon off on one because I did not feel like buying them over the course of a few days...although it would have saved me $10 at least)
- Matte mod podge
- Brown Ink
- Gold Ink
- Make Up sponges or some little thing you can dab ink on and off
- Sponge brush or other to apply MP
- Exacto Knife
- Lay out your canvases on the front of the map so that you can make sure you like how they are arranged. I really wanted most of North America to be on the same canvas so I made sure my layout fit the perameters.
- Carefully using the Xacto Knife, cut the map into the pieces that will go on your canvas. If there is a little overhang it is ok because we will use that to distress it later.
- Mod podge the map pieces onto the coordinating canvas sizes, smoothing out wrinkles to whatever degree you like. By using these larger canvases I imagine that it would be next to impossible to get it smooth, unless you use something like spray adhesive. Mod podge wets the canvas and so wrinkles are likely.
- Put a single coat of MP over the map and allow it to dry for a few minutes. While it is still a little damp, if you want to distress your edges, either tear any pieces that are hanging over the edges or take your Xacto knife and scrape along the edges of the canvas until desired amount is taken off. This will make a mess, so put some paper down under it.
- Next, using your brown ink pad, press the ink pad along the edges of the canvas, varying the amount and putting a lot in the corners. Come back with the gold ink and stamp it more toward the inner side of the edges, and blend with a sponge. Repeat this process until you have the desired look.
- Take brown and/or gold in on a sponge and "distress" some of the wrinkles in the map.
- Let it dry completely (I let mine dry overnight) and then put either a couple more coats of mod podge or a couple of coats of spray polyurethane on it, whichever is easier. I have not gotten to this point yet and I am leaning toward using spray poly as I tend to like it better and mine kinda smells like bananas (random but true). When I left last night my ink was still wet but I am almost positive it will be dry by the time I get back to it later today.
- Old newspaper articles, either one large one or a collage of small ones (future gens will likely not have physical papers, so this could be really neat art later)
- Magazine covers and/or articles
Now, on to that rotating bookshelf I have been scheming over! Pin It Now!
Friday, July 6, 2012
It Takes All Kinds
I am a firm believer that everyone has something to bring to the table. Each of us has things we are good at, and others we are AWFUL at attempting. There is really no way we could do everything in life on our own. For instance, if I had to build something with power tools at this moment, it would fall over.
Not to say that I won't learn power tools, but that is beside the point.
When you work at a bank, you get to see the good, the bad, and the ugly of the financial world. It is a sad but true fact that favorites are always played and it really isn't always fair. I have seen people practically dive under their window to avoid waiting on a certain customer for whatever reason. And I am not saying there are not any people slightly leaning toward the crazy side that I don't sometimes want to dodge myself, but behind a lot of crazy or smelly or downright hard to deal with customers are some nice folks.
For instance, a guy walked in a few weeks ago that when everyone saw him coming there was a chorus of "ughs" and "oh please not my window". I see each customer like this: either I wait on them and have something to do for five minutes, or I avoid them and continue to be bored. So I put on my most chipper of expressions and perked right up when he walked in the door, and of course won him over to my window. Granted all of my "competition" was ducking down and looking away. So maybe it was winning by default.
And you know, he immediately started cracking jokes about how we must have opened just for him that day. He was extremely pleasant and I let him know that sadly we had not had time to blow up the balloons and put up the banners that we should have had since we "opened just for him". The other tellers, needless to say, really missed out on a pleasant guy.
I think your attitude directly sets the attitude of your customer. An infectious smile can subconciously start to perk them up as well, and really set the tone for the rest of the encounter.
There are people all over the world that really are not the one you would choose to deal with if you got to make the call. But even the smelly customers who probably haven't showered in the last week can have something to bring to the table. And like it or not, their business is part of what justifies your paycheck. If only the perfect people had accounts we would be in serious trouble as bankers (especially us summer helpers haha).
I have also found that more often than not, some of the "less than desirable" people in life turn out to be the ones that would really come through for you in a pinch. We have had some questionable people that we had the joy of calling friends throughout the years and they have surely saved us in times of need.
When I was a kid in elementary school, my mom MADE me invite everyone to my birthday parties. I pretty much hated doing it, because it was weird to give invites to people that I really didn't talk to...ever...but looking back and remembering the excitement (and oftentimes SHOCK on peoples faces when they got that invite) makes me sure I will force my kids to do the same later on in life.
What if no one ever invited you to a party? What if everyone hid when you came in the door? What if no one ever legitimately seemed happy to see you?
I really think this is why people get dogs. Dogs truly look so incredibly happy to see you when you get home as if they will just bounce right out of their skin. So if by any chance you are in the customer service business, or just interact with people on a daily basis, and by all means if you are a teacher/professor in any level of school, try to make people think you are happy to see them...even if really you want to strangle them because they are making your job one million times harder. It might be the only smile they get all day.
On a random sidenote, I think this all goes back to the Grinch when his heart grew 3 sizes or whatever- I feel like him. A couple days ago I caught myself thinking about how scared the spider must have been that I was whacking with a towel and I genuinely felt bad for causing him so much panic...
And it is at this point at which I am sure I must be losing my mind... Pin It Now!
Monday, July 2, 2012
Bathroom: Complete
Well I am one bathroom paper holder, a trashcan, hand soap and towels away from a very cute budget bathroom being complete! Here is a recap of everything I have done up to this point:
 Meet my first awesome find. At a Peddler's Mall I ran across a 3 panel mirror set that had metal decorative pieces, as shown here. The ones on the two thinner panels have little candle holder guys in them and I was not too thrilled with that.
Luckily, I am a fiend as far as repurposing and deconstructing goes, and I noticed that the metal things could be taken off with a few quick turns of a screw driver.
Thank God they didn't need a drill, that's all I'm saying.
So for ten dollars, the three mirrors were mine. I brought them home, used E6000 to glue the panes in better and the backs on as well as some of the tabs that held the mirror in were old and breaking off.
I braided 3 22gauge wires together to fashion a picture hanging wire, and managed to get some screws in the wall to hang the little guys. I did forget to wipe off the mirrors, which probably would have been nice to do before hanging. But the optimistic side of me says they will just look like they have been there forever :).
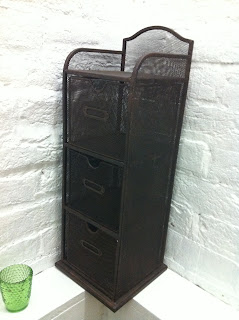 For my next trick, I found this cool looking mesh drawer thing for $9 on a Hobby Lobby clearance rack. It is maybe a foot or so tall, and easily went on the wall with command strips and a couple of finishing nails.
I mounted it on the wall with the paintable wallpaper, and as you can see by this picture bought some small glass things to put on it, some clear some green.
Random sidenote: Command picture hanging strips are completely and utterly fantastic...but will not stick on slick walls. So if I tried to hang it up on the glossy brick it most likely would have fallen.
I understand now why my memo board fell at school on the slick concrete block walls...and my hooks fell...and everything else.
I finally figured this out when I sent a set of mini blinds crashing to the ground...yes yes I know, who in their right mind tries to hang mini blinds with command strips. I would have succeeded too if it hadn't been for that meddling paint.
 As you can see in this picture the chandelier cover looks super cute!
However, the yellow twine they had used for string pulls did not exactly go with my style. So I raided Hobby Lobby for some chain...
Well, I tried to. I actually went in to HL and they had NO CHAIN whatsoever. I am not sure if they are reorganizing that particular store or just trying to send me in to convulsions. So I had to leave and go to Michael's.
At Michael's I bought two kinds of chain, over 3 ft of each. I used almost all of the chain I bought, so good thing they came with that much. I got one with circular links about .25 inch in diameter and another with much smaller links.
I threaded the smaller through the larger, attached two large diamond shaped jewels at the bottom to coordinate with the jewels in the chandelier using the same 22 gauge, and securing it with a dab of E6000.
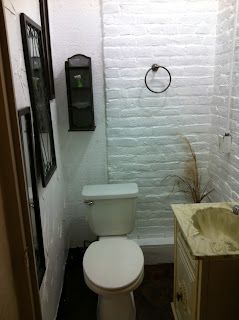 In the back of this picture you can see two things I had not mentioned yet. There was a towel ring that I scored at a Peddler's Mall for TWO BUCKS! It is pewter looking and super fantastic, and the best part is I installed it MYSELF.
- Paper sacked the floor and applied English Chestnut stain, two coats of high build polyurethane, and one coat of antique walnut Polyshades
- Paper sacked the walls and painted with two coats of Behr Ultra Pure White paint in semi gloss (this is basically my new favorite paint)
- Switched out the icky incandescant bulb for a bright white CFL
- Made a "chandelier" cover for the built in light
- Put down a cute white rug for comfy toes everywhere, and to protect the part of the floor that will see the most wear and tear

Luckily, I am a fiend as far as repurposing and deconstructing goes, and I noticed that the metal things could be taken off with a few quick turns of a screw driver.
Thank God they didn't need a drill, that's all I'm saying.
So for ten dollars, the three mirrors were mine. I brought them home, used E6000 to glue the panes in better and the backs on as well as some of the tabs that held the mirror in were old and breaking off.
I braided 3 22gauge wires together to fashion a picture hanging wire, and managed to get some screws in the wall to hang the little guys. I did forget to wipe off the mirrors, which probably would have been nice to do before hanging. But the optimistic side of me says they will just look like they have been there forever :).

I mounted it on the wall with the paintable wallpaper, and as you can see by this picture bought some small glass things to put on it, some clear some green.
Random sidenote: Command picture hanging strips are completely and utterly fantastic...but will not stick on slick walls. So if I tried to hang it up on the glossy brick it most likely would have fallen.
I understand now why my memo board fell at school on the slick concrete block walls...and my hooks fell...and everything else.
I finally figured this out when I sent a set of mini blinds crashing to the ground...yes yes I know, who in their right mind tries to hang mini blinds with command strips. I would have succeeded too if it hadn't been for that meddling paint.

However, the yellow twine they had used for string pulls did not exactly go with my style. So I raided Hobby Lobby for some chain...
Well, I tried to. I actually went in to HL and they had NO CHAIN whatsoever. I am not sure if they are reorganizing that particular store or just trying to send me in to convulsions. So I had to leave and go to Michael's.
At Michael's I bought two kinds of chain, over 3 ft of each. I used almost all of the chain I bought, so good thing they came with that much. I got one with circular links about .25 inch in diameter and another with much smaller links.
I threaded the smaller through the larger, attached two large diamond shaped jewels at the bottom to coordinate with the jewels in the chandelier using the same 22 gauge, and securing it with a dab of E6000.
 In the back of this picture you can see two things I had not mentioned yet. There was a towel ring that I scored at a Peddler's Mall for TWO BUCKS! It is pewter looking and super fantastic, and the best part is I installed it MYSELF.
That's right. The power-tool helpless female got herself a towel ring installed. TAKE THAT BOYS! :)
Also, sitting on the weird box that the last people insisted upon building over the pipes that run along the floor (instead of just installing the vanity back there which would have made a lot better room sense) is an old green jug turned vase with some dried ornamental grass from the yard.
The vase looks a lot like something Captain Jack Sparrow would have drank out of.
With the mesh drawers, I mounted the base on there and quickly discovered it was going to be way cooler in this room without the drawers in it. So the drawers will be relocating to my Craft Mecca when revamping begins up there. I put two clear dishes, the green glass thing in the picture with the drawers, and a green glass rock. I put a few little Qtips in the green glass and will be putting face pads and tooth flossers in the other dishes. But just a few so as to not get too cluttery! (words I never thought I would say).
Oh, and I still need to find a mirror for above the vanity. I have no idea what I even want for it. But all in all, I call this room FINISHED!
So the next time you are redo-ing a room, think of budget facelifts and get to cranking!
Pin It Now!
Subscribe to:
Posts (Atom)